Bitcoin Integration (Obsolete)
The Wanchain cross-chain feature currently includes mainnet and testnet connections with the Bitcoin network. This means that users can use the Wanchain multi-party computing Storeman solution to convert BTC coin on Bitcoin to wBTC (Wanchain BTC token) on the Wanchain network, as well as convert the Wanchain token back to native BTC.
Inbound Transactions

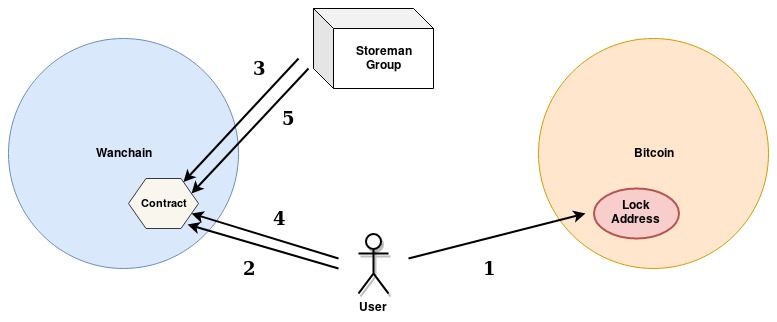
Steps for Inbound Bitcoin Cross-chain Transaction
- Make a Bitcoin transaction that locks funds in a user-generated timelock P2SH address with a specific redeemScript.
- Make a contract call on Wanchain to announce the locked funds.
- Wait for a followup contract call on Wanchain from the Storeman group that confirms the lock.
- Make a smart contract call on Wanchain to redeem the token.
- Wait for a followup contract call on Wanchain from the Storeman group that finalizes the transfer.
Whereas for inbound Ethereum transactions the first step is a single lock call to the smart contract, for inbound Bitcoin it involves 2 steps: one to lock the bitcoin in a timelock P2SH address, and one to request to the Storeman group to initiate the cross-chain transaction using the given funded P2SH address. When the Storeman group sees the lock method called on the Wanchain contract, the Storeman group continues by confirming that the P2SH was generated with the correct P2SH opcodes, and thus has a valid redeemScript. If the address is valid and once the funding transaction has enough confirmations, the Storeman group proceeds by making a followup call on the Wanchain smart contract, which locks the Wanchain token and announces that the token is ready to be redeemed.
Like the Ethereum integration, the smart contracts for the Bitcoin integration
enforce that the funds are redeemed within a given time period. In the case of
Bitcoin, if the the funds are locked but the redeemer does not redeem the token
within 36 hours, then the transaction will move to a “Revoked” state. If that
happens, the redeemer will no longer be able to redeem the token, and the
sender will have to make a Revoke call to get the locked BTC back.
Outbound Transactions
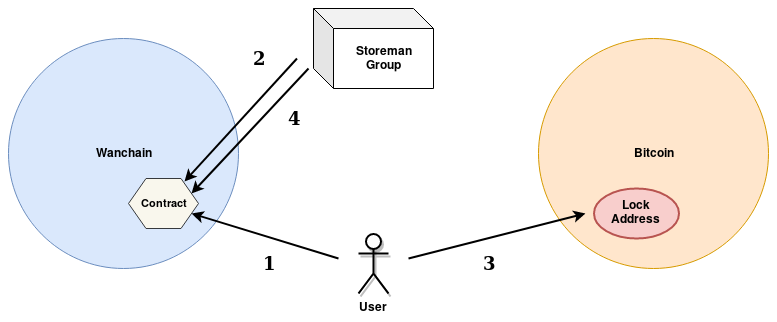
The steps for outbound transactions are similar to the steps for inbound transactions, though with a few minor differences.

Steps for Outbound Bitcoin Cross-chain Transaction
- Make a transaction on Wanchain that locks the tokens and that includes the outbound fee in WAN.
- Wait for a followup contract call on Bitcoin from the Storeman group that confirms the lock, and that announces the P2SH address where the funds are locked, as well as the id of the transaction that funded the address.
- Redeem the BTC from the P2SH address, signing the transaction with the pubkey of the address provided in the initial lock call.
- Wait for a followup contract call on Wanchain from the Storeman group that finalizes the transfer.
Like with inbound transactions, if the outbound redeemer does not redeem
within the time of the timelock defined in the P2SH address, then the BTC will
no longer be redeemable. The Storeman group will reclaim the BTC and the
transaction will go into a “Revoked” state. In that case the Revoke call must
be made by the sender to get the locked token back.
Connecting to Bitcoin
In the following examples we will use wanx to make cross-chain transactions,
which requires that we have access to a Bitcoin full node with RPC and
transaction indexing enabled. If you not have access to a Bitcoin node
already, follow the steps below to get one set up. If you do already have a
Bitcoin node, just make sure it is configured with the all the items in the
example bitcoin.conf file shown below.
Install bitcoind
Of course there are many ways to obtain the bitcoind binary. The two options show below are a just couple of the easier ways to install bitcoin, but as always, use your own discretion when deciding where to get your binaries!
Option 1 - Install Bitcoin Core
On Mac, installing the Bitcoin Core package is the simplest way to get the bitcoind binary.
- Download and install Bitcoin Core (https://bitcoin.org/en/choose-your-wallet)
Option 2 - Install bitcoind from ppa
On Ubuntu, you can install bitcoind easily from the ppa.
$ sudo apt-add-repository ppa:bitcoin/bitcoin
$ sudo apt-get update
$ sudo apt-get install bitcoind
Configure node settings
Update the bitcoin config file (~/.bitcoin/bitcoin.conf) and add the required
settings to allow RPC connections to the node. Use at least the following
config settings.
bitcoin.conf
server=1
rpcuser=myuser
rpcpassword=mypassword
txindex=1
If you want to be able to connect to the bitcoin node from another machine,
also set the rpcallowip option. Though remember, if you decide to open up the
node to the outside, make sure you protect it somehow. You do not want anybody
but yourself to be able to RPC connect to the node!
rpcallowip=192.168.0.0/24
Start bitcoind
Now, start the bitcoind daemon in testnet mode.
$ bitcoind -testnet -daemon
After a while test that you can connect to the Bitcoin node from the command
line using bitcoin-cli. The initial sync may take several hours, but you
should get results from the getbestblockhash command once the initial sync
begins.
$ bitcoin-cli -testnet getbestblockhash