ERC20 Token Integration
In addition to the Ethereum integration, the Wanchain cross-chain feature supports a selection of ERC20 tokens on the Ethereum network. This means that users can use the Wanchain multi-party computing Storeman solution to convert an ERC20 token on Ethereum to the corresponding WRC20 token on Wanchain, as well as convert the token on Wanchain back to native token on Ethereum.
Inbound Transactions
For the ERC20 integration, the steps required for an inbound cross-chain transaction, are basically the same as for Ethereum, except that there is an additional initial step, which approves the token to be transfered by the cross-chain smart contract.
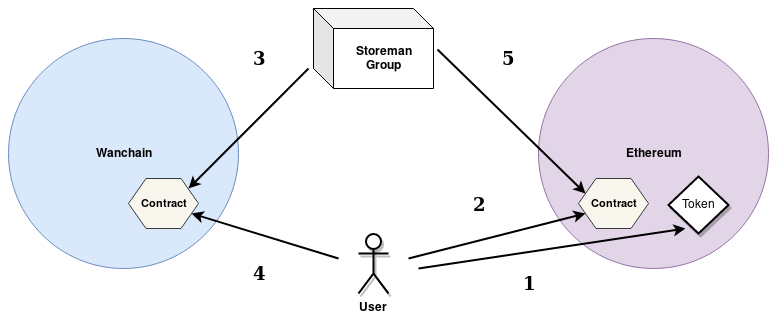
Steps for Inbound ERC20 Cross-chain Transaction
- Make a transaction on Ethereum that approves the token to be transfered by the cross-chain contract.
- Make a transaction on Ethereum that locks funds with the cross-chain smart contract.
- Wait for a followup contract call on Wanchain from the Storeman group that confirms the lock.
- Make a smart contract call on Wanchain to redeem the token.
- Wait for a followup contract call on Ethereum from the Storeman group that finalizes the transfer.
Just as with the Ethereum integration, the smart contracts enforce that the
funds are redeemed within a given time period. That is, if the the funds are
locked but the redeemer does not redeem the token within 4 hours (the time
until expiration for ERC20 tokens), then the transaction will move to a
“Revoked” state. If that happens, the redeemer will no longer be able to redeem
the token, and the sender will have to make a Revoke call to get the locked
ETH back.
Outbound Transactions
The steps for outbound transactions are similar to the steps for inbound transactions, though with a couple small differences.
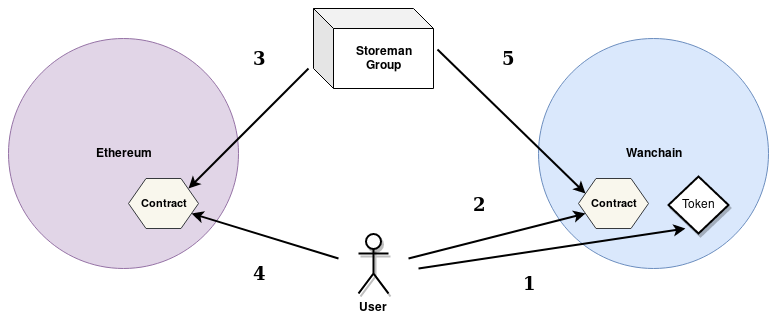
Steps for Outbound ERC20 Cross-chain Transaction
- Make a transaction on Wanchain that approves the token to be transfered by the cross-chain contract.
- Make a transaction on Wanchain that locks the tokens and that includes the outbound fee in WAN.
- Wait for a followup contract call on Ethereum from the Storeman group that confirms the lock.
- Make a smart contract call on Ethereum to redeem the coin.
- Wait for a followup contract call on Wanchain from the Storeman group that finalizes the transfer.
Besides working on opposite chains, the main difference from the steps for an
inbound transaction is that for an outbound transaction the Lock call to the
smart contract must include an outbound fee, priced in WAN.
Also, like with inbound transactions, if the outbound redeemer does not redeem
within the time limit then the transaction will go into a “Revoked” state and
can no longer be redeemed. In that case the Revoke call must be made by the
sender to get the locked wBTC back.
Connecting to Ethereum
In the following examples we will use wanx to make cross-chain transactions,
which requires that we have a connection to the Ethereum network, for both
sending transactions and listening for contract events. For the mainnet
integration we will need to connect to the Ethereum mainnet, naturally, and for
the testnet integration we will need to connect with the Rinkeby network.
Running an Ethereum comes with its own challenges, which we will not cover here. While you can run your own Ethereum node, for the examples below we will instead rely on Infura, a gateway service for the Ethereum network.
If you are running your own Ethereum, you can use web3 to connect to it by passing in a new HTTP provider with the node’s URL when initializing web3. For example, if the node is running on the same machine as the script, we can initialize web3 like so:
const Web3 = require('web3');
const web3eth = new Web3(new Web3.providers.HttpProvider('http://localhost:18545');
To use Infura instead, we can initialize web3 in the same way, but instead of passing in the URL of the Ethereum node, we pass in the Infura URL.
const Web3 = require('web3');
const web3eth = new Web3(new Web3.providers.HttpProvider('https://rinkeby.infura.io/<myToken>');
Make sure to add your Infura token to the URL. For testnet you should use the
rinkeby.infura.io subdomain, as shown above, while for mainnet you should use
the standard infura.io domain.